|
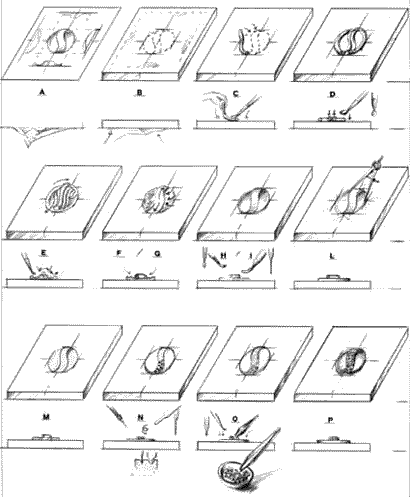
If we want to represent the volumes of a design it is best to start, for the first times, with simple shapes and not very complex. Once we have marked with a pencil on our support (dis. 3 A-B-C-D) the contours of the object, (if the plexiglass is used as a support, the design can be fixed underneath it and read in transparency), get a little bit of clay and start to set it out on the design following its contours and filling it up in the centre and trying to enlarge the thickness, where the design requires it (dis. 3 F-G). Adding the material again and again some steps will appear and will have to be levigated with the right stick, this means with the right dimensions and shape. Keeping under control the lateral sights and the perspective, the design will be a good help, the volume studied in the project will be given to the model (dis. 3 H-I). For a right copy we can help ourselves with a compass with double points getting from the design those measures or reference points that determine the immagine of the piece (dis. 3 L). With the largest sticks the general volume will be sketched while with the smallest the particular will be showed using the finest points of the needles. Using two or three different colours of clay, that contrast effect will be given (dis. 3 M). When the dimensions are right pay attention because it is very easy to move the material on a different coloured one in the last phase of the work by pressing and removing it. If we want to increase
|
|
|
the rendering of the final effect we can add some stones. Once the whole volume is developed in the right way, the material beneath the stones will have to be removed (dis. 3 N). When this is done, the stone can be laid down on the arrangement that has just been prepared.
|
|
